The website that this post is hosted on was built using Nuxt.js, Vuetify.js, and Gitlab Pages (as well as a few solid npm packages, but I'll get to that later). It has a few neat features, such as:
- Free static hosting with Gitlab Pages (up to 10 GB).
- Beautiful themes, layouts, and dynamic content via Vuetify.js.
- Automatically constructed routes from markdown files.
- HTML and Vue component rendering from within markdown files.
- and more.
This article is a tutorial that I wrote that you can follow to make a site just like this one. If you're interested, keep scrolling!
Start a Gitlab Pages Project
In order to host your site, we will be using static hosting provided free by Gitlab Pages. If you don't already have an account with Gitlab, I highly recommend it. You can go here to make one.
If you'd like to read about Gitlab Pages some more, this page has a good explanation about what it is, and I found it really helpful when I was starting this project.
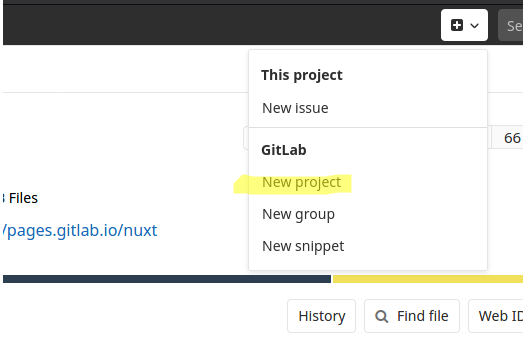
So now that you have an account with Gitlab, you'll want to start a new project. You can do this via the button at the top of the screen seen in the screenshot below. This is visible when you're logged in.
According to Gitlab's page that I linked above, if you fork (copy) one of their example sites you'll need to change your project name to username.gitlab.io (where username is replaced with your own) by going to the project's Settings > Advanced. However, we are making a project from scratch, therefore you can simply start a new project with the project name filled out as username.gitlab.io. I have an example from my own shown below.
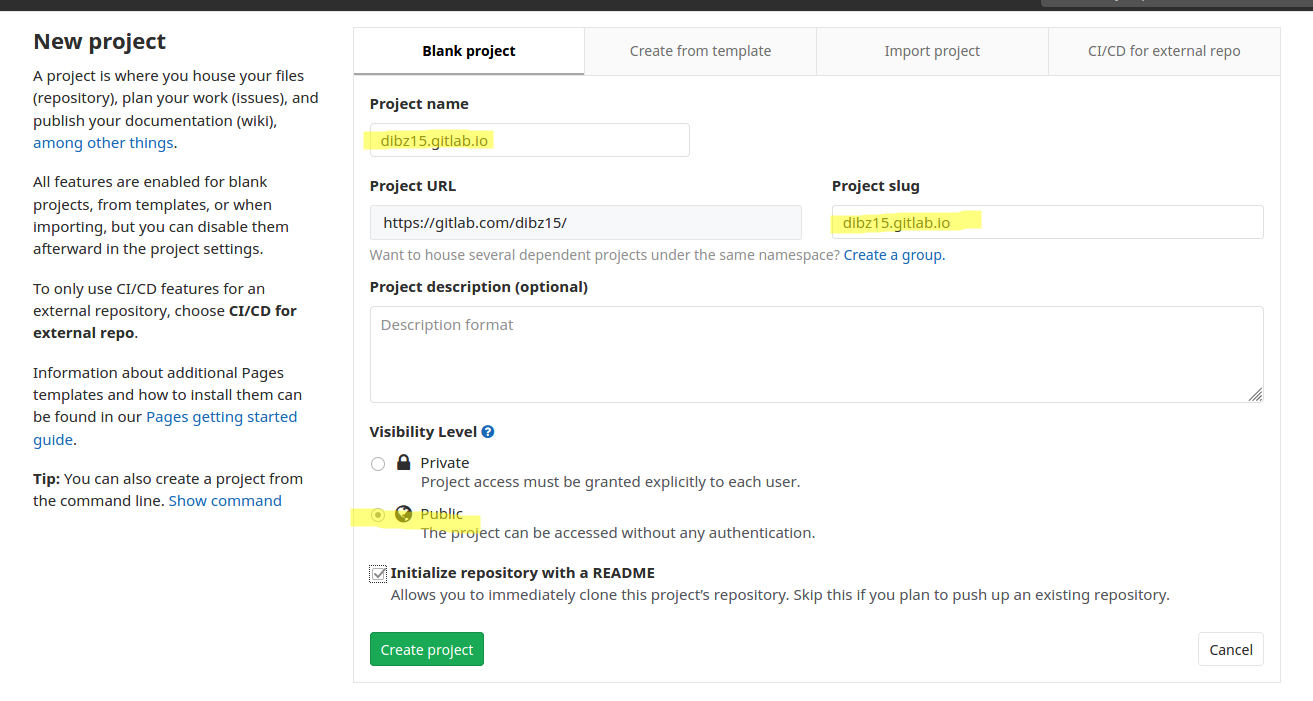
After that's filled out, click "Create project".
Note that if you want other people to be able to access your site, it needs to be set to Public, as I highlighted. You can then change access permissions later in Settings > General > Visibility, project features, permissions if needed.
Next, it's time to initialize the repository onto your own workstation. After you selected "Create project", the following screen should have been presented to you.
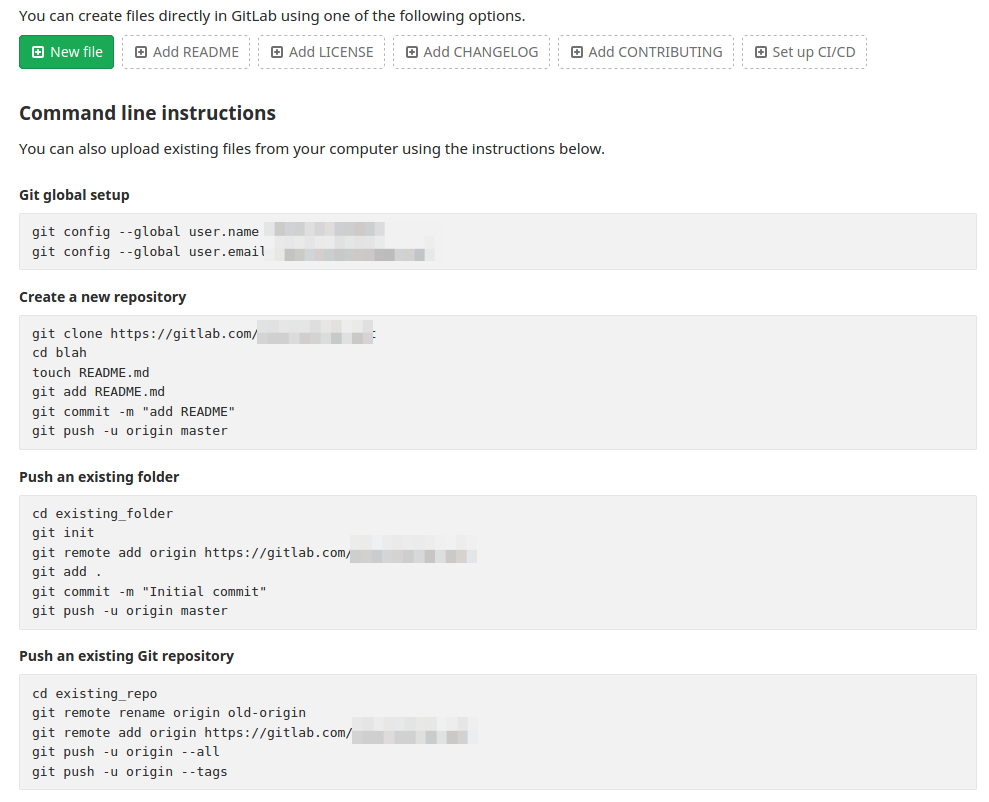
I usually either follow the instructions under Create a new repository or Push an existing folder, but the choice is yours.
After that's done, you'll have a project folder on your computer that's linked to the Git repo, from which you can commit changes.
Initialize a Nuxt Project
This step assumes that you have an empty Git repo on your machine that is linked to your username.gitlab.io project from earlier. If you don't have it already, you're going to need to install npm or yarn since we'll be working with a lot of different packages. I generally use npm, but wherever I can, I will list the commands for either one. In case you're unfamiliar with npm, I found a quick tutorial for installing it on Windows. For Linux, it's generally as easy as sudo apt-get install npm.
After you have one of those installed, we can really get started. I adpated the next few instructions from the nuxt-create-app repo.
In your command line, navigate to your empty Git repo folder, and type one of the following:
npm init nuxt-app <my-project>
or
yarn create nuxt-app <my-project>
Of course, replace <my-project> with your own project name.
Configure Nuxt & Gitlab
After you have typed in one of the previous commands, an interactive project builder will begin. You can select project options using the keyboard and arrow keys, and then each option is selected by pressing the <Enter> key.
My configuration looked like this:
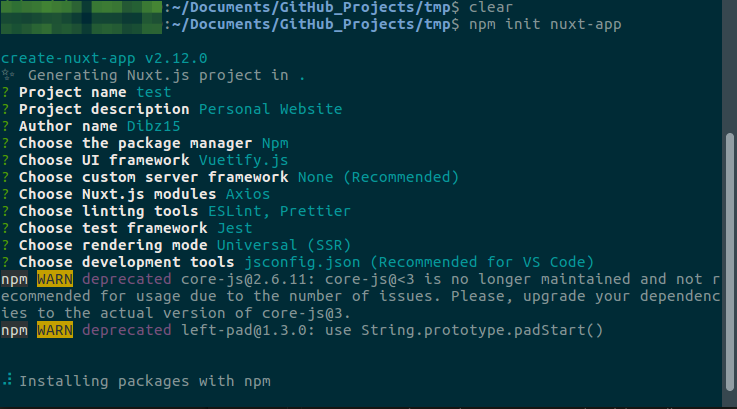
You can see that I named my project test, I am using npm as the package manager, Vuetify.js is our UI framework, and I selected to use Axios, ESLint, Prettier, and Jest. We also want this to be a static site, so be sure to choose Universal (SSR) for the rendering mode.
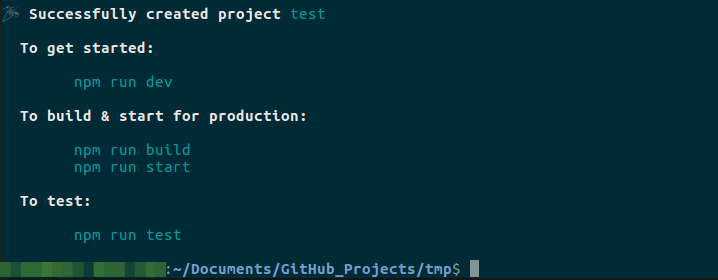
Once the project is finished building, if it was successful your terminal should look like the following.
By the way, if you're curious about the difference between static and dynamic sites, as well as what SSR might be, Gitlab has a great article on Static Site Generators.
Now that we have a nice, shiny new Nuxt project, go ahead and run npm run dev to start your local development server.
You'll get some output; a status bar for the server-side render. Once it's done compiling, it'll look something like this:
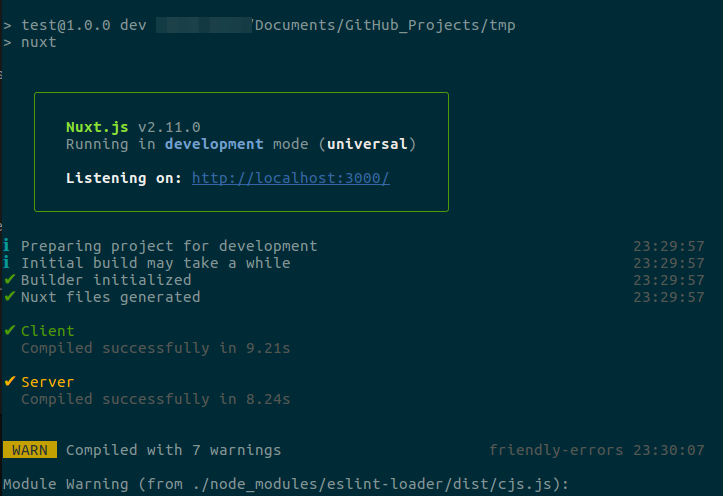
Note that I had warnings below that, but it seems safe to ignore these ones.
Now your server should be up, so you can navigate to http://localhost:3000 in your browser in order to see your site template up and running.
Looks good, right?

Yes, but it is still lacking content. As of right now, it only has a few routes (which you can access via the navigation drawer on the left, if you want). But we'll get to that soon.
In the meantime, we need to configure our project so that Gitlab Pages can compile and serve your site. In order to do that, we need to create a file .gitlab-ci.yml. On Linux, this is as simple as the command
touch .gitlab-ci.yml
Inside this file, you need to copy & paste the code below.
image: node

before_script:
  - npm install

# cache:
#  paths:
#    - node_modules/

pages:
  script:
    - npm run generate
  artifacts:
    paths:
      - public
  only:
    - master
This instructs Pages to serve our site by running npm run generate, and tells it that it will find the compiled site in the public directory.
One thing to note is that I have commented out a few lines after cache. This is because one way to save server compile time is by caching npm dependencies. Unfortunately this was causing me issues, so I have it disabled for now.
Now I wish that were it, but there's one more thing we need to do in order to get the site running on Pages. In thhe nuxt.config.js file, we need to add the following code, into our module.exports.
/******************************************
 * Customize generate
 ******************************************/
generate: {
  dir: 'public'
}
This can go anywhere within the JavaScript object, but I placed mine right after the following line:
loading: { color: '#fff' }
Now, go ahead and commit and push your changes with Git. This should then start a Pages pipeline which will render your website at the address username.gitlab.io, where username is your own. Mine for example is dibz15.gitlab.io.
If you want, you can actually view the pipeline in action as it serves your site. To open the pipelines view, there is a button for it on the left sidebar.
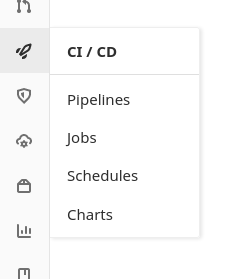
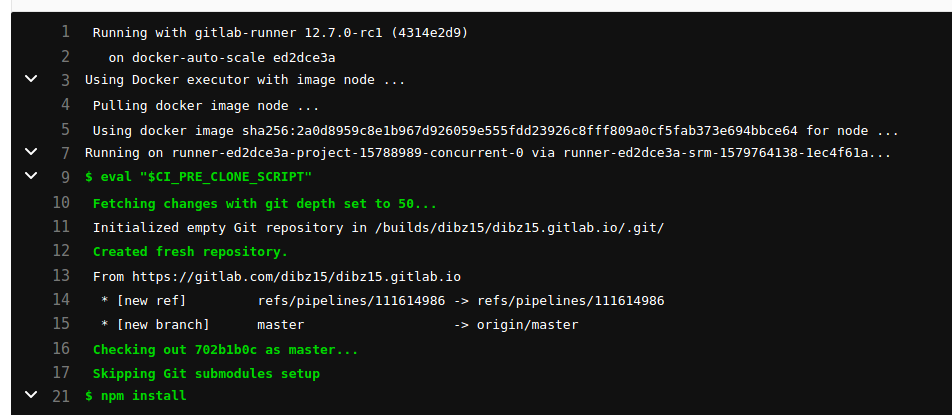
It's a little tricky to find, but once you get navigated to it there's a terminal like this:
What we are interested in now is how to add new pages to this site. Well, for my site, I used several basic static routes, and some Nuxt.js magic to make a bunch of dynamic (nested) routes. To understand the difference, I recommend reading the Nuxt document page on routing.
Basically, Nuxt.js automatically generates a website route heirarchy based on what's in your project's pages directory. So if you have a file tree like the following:
  pages/
  --| user/
  -----| index.vue
  -----| one.vue
  --| index.vue</code>
then what is actually compiled are the following routes:
/user
/user/one
For static routes, Nuxt looks inside the pages directory and converts any folder containing a file named index.vue into a route with the name of the folder. In the above example, the user directory contains an index.vue file, and therefore the route /user is produced. Additionally, any file with a .vue ending within a folder gets turned into its own route. So again, in the above example, one.vue within /user becomes the route /user/one.
As a final note, index.vue within the pages directory simply becomes your website's root path. So in my case, if someone navigates to austindibble.com, they're automatically directed to the / route which is created from the pages/index.vue file.
With regards to dynamic routes, things get a bit trickier. Basically, we can use an underscore syntax on our file and folder names to be able to access the route parameters. For example, if we have a folder structure like the following:
  pages/
  --| _slug/
  -----| comments.vue
  -----| index.vue
  --| users/
  -----| _id.vue
  --| index.vue
then we get these routes:
/
/:slug
/:slug/comments
/users/:id?
If you're not familiar with the route syntax, that's okay. /:slug just means that in your index.vue you'll be handed a route parameter with the name of the route in a variable. So if someone navigates to /sandwich, then in your index.vue you'll get the string 'sandwich'. For /users/:id?, the ? just means that the id portion is optional.
So, why did I take the time to explain all that? Well, it's important for this next part. What we want to do is put markdown (.md) files in a directory, and have Nuxt automatically generate the routes for us. So, let's say we put all of our files in a content directory. Well then if you have a file about.md, the route /about is automatically generated for your site. As well, if you have a /posts directory, then any .md files within that directory are automatically converted into routes that start with /post. Pretty awesome!
Build Pages & Routes from Markdown using Nuxt Routing
Now as a bit of a disclaimer, Nuxt doesn't naturally use markdown files to render website routes. It takes a workaround, and normally someone might use a CMS ike contentify in order to manage their web content--which is smart. I'm a bit of a rebel, so I wanted to have all of my web content hosted in my Gitlab repository.That's why I went the (more difficult) route of serving up rendered markdown files. It took a lot of trial and error, but in order to save you from that I hope to make it very easy and clear to copy my work.
Here are some other blogs/resources that I read and took inspiration from in solving figuring this out:
- Including Markdown Content in a Vue or Nuxt SPA
- starter-for-nuxt-markdown-blog
- Website with blog and portfolio using Vue.js + Nuxt + Markdown
However, since I found their guides incomplete, I am hoping to be even clearer in my instruction.
So, in order to get Nuxt to turn our markdown files into routes, what do we do? Well, we need to make it aware of them. To do this, we are going to change the generate.routes function within nuxt.config.js to map our markdown files into route URLs. And in order to do that, we need a function that will find all of our .md files, get their names, and convert them to URL paths. In order to save you the pain, I already have it written and working.
I have the following code in a file in my root directory named generatePostList.js:
const fs = require("fs");
var path = require("path");

// Get all files as an array of path strings within a given directory
const getAllFiles = function(dirPath, arrayOfFiles) {
  files = fs.readdirSync(dirPath)

  arrayOfFiles = arrayOfFiles || []

  files.forEach(function(file) {
    if (fs.statSync(dirPath + "/" + file).isDirectory()) {
      arrayOfFiles = getAllFiles(dirPath + "/" + file, arrayOfFiles)
    } else {
      arrayOfFiles.push(path.join(dirPath, "/", file))
    }
  })

  return arrayOfFiles
}

// Function to generate our list of markdown URLs
const generatePostList = function (base = 'static') {

  // Get all file paths within root directory (default 'static')
  const arr = getAllFiles(path.join('.', base, 'posts'), null);

  var fileData = { posts: [] };

  // For every file path
  for (var i = 0, len = arr.length; i < len; i++) {
    let file = arr[i];

    // Read file
    const data = fs.readFileSync(`${file}`);

    // Discard base name
    file = file.replace(base, '');

    // Get everything before '.'
    file = file.substr(0, file.lastIndexOf('.'));

    //Append URL and filepath string to our list
    fileData.posts.push( { 'url': `${file}`, 'filePath': `~${base}${file}.md` });
  }

  // Convert JavaScript object to string
  var fileContent = JSON.stringify(fileData);

  // Write file data
  fs.writeFileSync(path.join('.', base, 'posts.js'), fileContent);

  // Return file data to caller
  return fileData;
}

module.exports = {
  generatePostList
}

// Not necessary, but helps us see that it's working by posting the results
const fileData = generatePostList('content');
console.log(`Post URL Data:`);
console.log(fileData);
Now we just need to make sure that this function is called when our site compiles. To do that, need to change some code in nuxt.config.js. The code snippet below is the exported 'generate' object within the configuration file.
generate: {
  dir: 'public',
  routes: function () {
    console.log('Generating Post List...');
    const fileData = generatePostList('content');
    let posts = fileData.posts;
    if (!posts)
      return '';
    console.log('Post Data: ');
    console.log(posts);
    let urls = posts.map(data => data.url);
    console.log('Generated URLs: ');
    console.log(urls);
    return urls;
  }
}
Note that my code assumes that you have your post content in a folder named 'content'. You can theoretically use any folder, as long as you change 'content' to the folder name. If you're wondering about the console.log calls, those are so that I can see the paths generated when my dev server compiles the paths after npm run dev.
There is one more change to make to nuxt.config.js, and it's at the bottom under the 'build' object. This just adds a configuration rule to our build, which attempts to load any .md files from the directory 'content' using 'frontmatter-markdown-loader' as the compiler that will turn our markdown into valid html. This is a special markdown loader that will enable you (with a little more work) to compile Vue components within your markdown files. This will allow you to embed page a variety of page content, such as YouTube videos.
/*
** Build configuration
*/
build: {
  /*
  ** You can extend webpack config here
  */
  extend (config, ctx) {
    config.module.rules.push(
      {
        test: /\.md$/,
        include: path.resolve(__dirname, 'content'),
        loader: 'frontmatter-markdown-loader',
        options: {
          mode: ["html", "vue-component"]
        }
      }
    )
  }
}
After adding that to nuxt.config.js, you'll need to run npm install frontmatter-markdown-loader in your command line so that it's available to render your content.
With those changes made, we can now start adding content to the site. If you want to simply make new pages using Vue components, no problem. Simply add a .vue file in your 'pages' directory, and the route will be generated for you. At that point, all you need to know is how to work with Vue. However, remember the conversation earlier about dynamic routes? This is where that comes into play.
Within your 'content' directory, make a new directory named 'posts' (the name doesn't matter, but follow along for this example). Within posts, make a new file named test.md and put some simple markdown in it like the following:
## I am a header!
[I am a link!](http://example.com)
Within your 'pages' directory, you also want to make a directory named 'posts'. Within that new posts directory, lets make two new Vue components: _post.vue and index.vue.
<template>
  <div class="content pt-12" v-html="content.html"></div>
</template>

<script>
export default {
  async asyncData ({params}) {
    // Load file content from filename provided by parameter.
    const fileContent = await import(`~/content/test/${params.post}.md`);
    return {
      content: fileContent.default,
      post: `test/${params.post}`
    }
  }
}
</script>
<template>
  <v-container
  class="fill-height"
  fluid
  style="max-width: 1400px;"
  >
    <v-row v-for="post in posts"
      :key="post._id"
      align="center" justify="center"
    >
      <v-col xs="12" :key="post._id">
        {{ post.path }}
      </v-col>
    </v-row>
  </v-container>
</template>

<script>
import Utils from '~/assets/utils.js'

export default {
  async asyncData({query}) {
    // Load all files from contest/test directory
    const context = await require.context('~/content/test/', true, /\.md$/)

    // Get objects, add in path
    let posts = await context.keys().map(key => ({
      ...context(key),
      path: `/test/${key.replace('.md', '').replace('./', '')}`
    }));

    // Return the posts array to our Vue component as data
    return {
      posts: posts.reverse()
    }
  }
}
</script>
This is getting a little more complicated, but not too bad. What _post.vue is doing is receiving a filename from the current route name parameter, and using it to try and find our .md file in our content/test directory. Once it has the filename, it loads the compiled markdown from the file and renders it as HTML in the page.
You can try it out by going to localhost:3000/test/test. You should see the markdown of test.md rendered in your browser. Something like this:

Now you have your markdown content served as an HTML page with its own route!
Serving Titles, Dates, & More using Frontmatter
The site now can render markdown pages in their own routes, but what about index pages like the one that I have at austindibble.com/posts? How does the site now what the title, date, and hero image for each post is?
This is all due to the magic of frontmatter. In this context, frontmatter is some YAML that is placed at the very top of your markdown files, which can hold any information you want: strings, dates, lists, numbers, booleans, etc. In my case, I use it to hold information about the post such as the publication date, post title & subtitle, path to the hero image, and whether it should be listed in the index.
An example of the frontmatter for this blog post looks like this:
---
post_title: How I Built My Site Using Nuxt.js, Vuetify.js, and Gitlab Pages
hero: ../images/posts/projects/personal_site/hero.jpg
excerpt_desc: A tutorial on starting a site with Nuxt.js and Gitlab Pages.
tags: project
date: 2020-01-20
---
The important thing to remember is the three hyphens on top and bottom, and that this must start at the very first line of your .md files.
So that's great, but how is this data accessed? Well, we get access to it thanks to the previously mentioned frontmatter-markdown-loader via an attributes object. To see how this works, let's amend the previous files test.md and index.vue.
---
title: Test title
---
## I am a header!
[I am a link!](http://example.com)
<template>
  <v-container
  class="fill-height"
  fluid
  style="max-width: 1400px;"
  >
    <v-row v-for="post in posts"
      :key="post._id"
      align="center" justify="center"
    >
      <v-col xs="12" :key="post._id">
        {{ post.path }}: {{ post.attributes.title }}
      </v-col>
    </v-row>
  </v-container>
</template>

<script>
import Utils from '~/assets/utils.js'

export default {
  async asyncData({query}) {
    // Load all files from contest/test directory
    const context = await require.context('~/content/test/', true, /\.md$/)

    // Get objects, add in path
    let posts = await context.keys().map(key => ({
      ...context(key),
      path: `/test/${key.replace('.md', '').replace('./', '')}`
    }));

    // Return the posts array to our Vue component as data
    return {
      posts: posts.reverse()
    }
  }
}
It's that easy! Of course, there's a lot more you can do with frontmatter such as adding dates and hero images, but I'm not going to explicitly cover that. If you're curious how I did it, you can check out my own index.vue. I've added a few nice features, such as sorting by post date, by otherwise it's not too complicated!
Vuetify your Pages
When building an interesting and attractive site, content is only part of the battle. At this point, our content is rendering but we don't have any CSS styles to make it look engaging and interesting. This is where Vuetify comes in. Vuetify enables us to quickly build a nice user experience without writing all of the CSS ourselves (much like Bootstrap, but at this point I am more fond of Vuetify).
Since Vuetify was installed earlier, it's already ready to use in any of your .vue files on your site. This includes index.vue, _post.vue, and any others. In order to tie this into our blog example, let's look at how we can use Vuetify to make our markdown pages more interesting. The principles of this example can be applied to any other pages.
So how can we make our markdown pages look more interesting? Well, the key is the _post.vue file from earlier. This is the page that wraps around each of the markdown pages as it is rendered. In my own site, I use _post.vue to render the hero image, display the title and subtitle, and set the overall style of my posts.
So for now, let's update our _post.vue file from earlier and make our markdown post look more like a blog format. Note that this is a simplified version of my own _post.vue file, and it's very useful!
<template>
  <v-container
  class="fill-height justify-center page-container"
  fluid
  :key="$route.params.post"
  >
    <v-row xs="12" align="center" justify="center" class="pt-6">
      <v-col cols="auto" xs="12" justify="start" class="center-col">
        <h1 class="my-4"
            v-bind:class="{ 'headline': $vuetify.breakpoint.xsOnly,
                  'display-1': $vuetify.breakpoint.smOnly,
                  'display-2': $vuetify.breakpoint.mdAndUp }"
        >
          <span v-if="content.attributes.title">
            {{ content.attributes.title }}
          </span>
        </h1>
        <v-divider></v-divider>
      </v-col>
    </v-row>
    <v-row xs="12" align="center" justify="center">
      <v-col cols="auto" xs="12" justify="start" class="main-text">
        <div class="content pt-12" v-html="content.html"></div>
      </v-col>
    </v-row>
  </v-container>
</template>

<script>

export default {
  async asyncData ({params}) {
    const fileContent = await import(`~/content/test/${params.post}.md`);
    return {
      content: fileContent.default,
      post: `test/${params.post}`
    }
  }
}
</script>

<style scoped>
.center-col {
  width: 100%;
  max-width: 850px;
}

.main-text {
  width: 100%;
  max-width: 750px;
}

.page-container {
  width: 100%;
  max-width: 1200px;
}
</style>
I'll admit that I still don't have a complete understanding of the usage of the Vuetify component v-container. However, I have found that it is useful to wrap it around v-row elements, which themselves are useful for series of vertically-separated content (such as a title, and a blog post).
If you'd like to learn more about using Vuetify and it's components, I recommend looking through the documentation (you can select components by name using the left sidebar), and the 'premium' example themes. They have source available that I have found very useful.
Next Steps
Now, the world is your oyster. You're free to make the site your own! I'd recommend adding content to the root index.vue file, and making a nice post index at the index.vue within your content directories (such as test in this example, but I imagine you'll want something like a 'posts' directory like I have).
I may end up making more posts about different content that I have added to my own site (such as how I embedded YouTube videos, or how I made my project timeline at austindibble.com/posts/projects), but for now this is it!
But I do have one more useful item for you. I have written a DynamicMarkdown Vue component that allows embedding Vue components within your markdown files and having them render in your posts. It's available in my Gitlab repo, but I've removed some extras so you can use the code below. Just copy and paste it into the file 'DynamicMarkdown.vue' within your 'components' directory. Then, you just need to change a few lines in _post.vue. Then, if you want to use a Vue component within your markdown, you just need to include it in your DynamicMarkdown file like any other Vue component.
<template>
  <component :is="content" />
</template>

<script>
export default {
  data () {
    return {
      content: null
    }
  },
  async asyncData ({params}) {

  },
  mounted () {
    this.content = () => import(`~/content/${this.name}.md`).then(fmd => {
      // console.log(fmd);
      return {
        extends: fmd.vue.component,
        components: { }
      }
    });
  },
  props: {
    name: {
      required: true
    }
  },
  methods: {
  }
}
</script>

<style lang="scss" scoped>
::v-deep img {
  position: relative;
  margin: 0, auto;
  max-height: 600px;
  max-width: 120%;
  margin-top: 1em;
  margin-bottom: 1em;
  left: 50%;
    -webkit-transform: translateX(-50%);
    -moz-transform: translateX(-50%);
    -o-transform: translateX(-50%);
    -ms-transform: translateX(-50%);
    transform: translateX(-50%);
  box-shadow: rgba(33,33,33,.2) 0 7px 28px;
}
</style>
<template>
  <v-container
  class="fill-height justify-center page-container"
  fluid
  :key="$route.params.post"
  >
    <v-row xs="12" align="center" justify="center" class="pt-6">
      <v-col cols="auto" xs="12" justify="start" class="center-col">
        <h1 class="my-4"
            v-bind:class="{ 'headline': $vuetify.breakpoint.xsOnly,
                  'display-1': $vuetify.breakpoint.smOnly,
                  'display-2': $vuetify.breakpoint.mdAndUp }"
        >
          <span v-if="content.attributes.title">
            {{ content.attributes.title }}
          </span>
        </h1>
        <v-divider></v-divider>
      </v-col>
    </v-row>
    <v-row xs="12" align="center" justify="center">
      <v-col cols="auto" xs="12" justify="start" class="main-text">
        <dynamic-markdown class="main-text font-weight-regular"
          :class="{ 'body-2': $vuetify.breakpoint.xsOnly,
                  'body-1': $vuetify.breakpoint.smOnly,
                  'title': $vuetify.breakpoint.mdAndUp }"
          :name="post"
        />
      </v-col>
    </v-row>
  </v-container>
</template>

<script>
import DynamicMarkdown from '~/components/DynamicMarkdown.vue'

export default {
  async asyncData ({params}) {
    const fileContent = await import(`~/content/test/${params.post}.md`);
    return {
      content: fileContent.default,
      post: `test/${params.post}`
    }
  },
  components: {
    DynamicMarkdown
  },
}
</script>

<style scoped>
.center-col {
  width: 100%;
  max-width: 850px;
}

.main-text {
  width: 100%;
  max-width: 750px;
}

.page-container {
  width: 100%;
  max-width: 1200px;
}
</style>
Cheers! If you have questions or think you have found a problem with my code or instructions please let me know.